My mother is a Coach FANATIC! She named her dog Coach and he wears everything Coach. So naturally, when I saw this, I had to do it. I'd be the best daughter ever if I won this for her!
The blogger with the most reshares wins. I probably have zero chance being a small blog with inconsistent posting frequency, but I'm going to try, so give it a share, everywhere!
Monday, August 6, 2012
Shatter Polish Love!
Okay, I have a selection of shatter/crackle polishes. One of my last posts was with a crackle polish. But in reality, I have not really liked these since day 1. The first two I bought were actually Christmas presents for my 11 year old and I was not impressed. Fun, but there's a lot more interesting things to do that I can control more. But my birthday was this weekend, and one of the things we did was use deals I had for a lot of beauty places. I had a $10 of $20 for Sally's so that was our first stop where I found the last few China Glaze Hunger Games polishes I didn't have and a bunch of CG Shatters all clearanced for $0.99! Up until now, all my cracking polishes were creams and I've bypassed others I've come across since I hadn't been excited by them. But these intrigued me. I was curious how they would really come out, would you really be able to see the cracking? I was wondering if I was just wasting my birthday deal on polishes I would hate though.
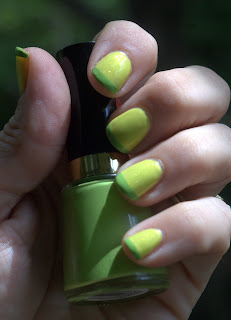
The next day, I was very short for time. I only had enough time for a color change. No time for art or even proper manicuring (hence my awful cuticles!), heck I didn't get to do any clean up until today, thank goodness the restaurant we went to was dark! So I didn't have time for much, and I had just spent way too much time on my make-up. I matched my outfit to my make-up and decided I wanted my nails to match too! I had green eyes and pants and pink lips and shirt.

I went with Revlon Sassy (this one shows up a lot in my manis, I am a sucker for this kind of green) underneath and China Glaze Glam-More for the shatter coat. Turns out it works really well! AND it's a great thing for some interest when there's not enough time for actual art! I love this way more than the cream crackles I have. The only downer is that the glitter sucks up top coat like crazy, this is two thick coats of SV and it probably need 2 more. I have read about using a ridge filling base or Gelous between the glitter and top coat, I really need to remember to try that since Gelous is the base I use. But otherwise, I was really happy with the glitter load, the shatter, and the sparkle! YAY!!! I wish I had been able to get a picture of my whole look, but I forgot. Bummer.
Do you have a favorite quick "cheat" for nail art when you don't have time?
Wednesday, July 18, 2012
Is It or Isn't It?
Here's a quick and simple mani, but the question is, is it a sponge gradient or a funky french?
This was done with a base coat of Gelous, two coats of Wet N Wild I Need a Refresh-mint, a coat of SV (I almost always seal nail art layers with SV so that I can rescue myself if my mistake isn't too big), the tips are Wet N Wild Bite the Bullet sponged on using a piece of a sponge roller, and then two coats of SV. This is my first time sponging, and I'm pretty happy with 90% of the results. That middle finger there looks a bit too solid of a line, but the other 9 fingers look great!

Both of these polishes are in the Wet N Wild Megalast line and have "pro" brushes. I'm not sure I really like them. First, I had to trim a few strands on the I Need a Refresh-mint but that's probably more about the fact that it's a cheap brand than brush shape. The bottle neck is too narrow, you have to be careful putting the brush in and there's no wiggle room for the plastic part, it seems like such an odd packaging method. Also, I don't have a lot of experience with brushes shaped like this, so I may find them difficult just for that. I find I press a lot harder with these so I am really bad about leaving gouges in my coats. Total BLECH!
I'm really happy with the sponging method and I can't wait to try a true gradient now! I used a tiny piece of sponge roller I tore off and I tapped a fairly dry brush to it. I tried make-up sponges and picking up polish from a palette, but this is the only method that transferred polish for me or left me with a sponging and not a stamped looking mess.
Keep watching, my hair is currently up in pin curls I rolled using that new tool. I'll be reviewing it soon!
Sunday, July 15, 2012
Not Your Mama's Mani
I was having a conversation with a friend a few weeks ago and she mentioned that she's kind of in a rut. She likes to do her nails sometimes, but she's not really into like I am, she's not a "girly-girl", and the only colors she really wears are red, black, and white. So I figured I'd use her as some inspiration for some nail art.

 But the red crackle just didn't stand out enough and looked...ucky...yes, it didn't even earn a 'y'! So I went back over the black again which is why it looks so thick. If I did this same design with these colors again, I would definitely put the crackle between the black and white to start, it would certainly be more pleasing if the black wasn't so thick on the nail. But if I were just doing the polishes together in a similar vein again, I would probably do white, red crackle, and then black funky french tips. I'm definitely not totally satisfied with it as it ended up, but it wasn't designed with my tastes in mind, so we'll have to see what she thinks.
On a non-nail note, has anyone ever used one of these Curl Easy Pro Volumizing and Curling Tools??
 I am a BIG fan of pin curls. They're a fabulous way to get terrific curls, no hooks on the ends, avoid heat setting, and get a fabulous vintage look if that's your thing too. My problem being that my hair is nearly to my waist and I got my Eastern European father's hair. It's pretty thick and doing them the traditional way can take me a couple hours to roll up. I had read about a Sculpture Pin Curler on a couple vintage hair blogs but I just can't pay $35 for a tool that I have zero experience with. I just happened to be out at Sally's Beauty today and saw these, the pink one is the smallest, and it looks to be a tad larger than the Sculpture Pin Curler, but actually narrower than I manage to make my hand-rolled pin curls so I think it's a good start for testing the structure of the tool. Stay tuned, I'll be posting my review of it soon!
*This post contains an affiliate link

2 coats of NK Really White
A thicker coat of Sally Hansen Crackle Cherry Smash
And by accident (keep reading!) 2 coats of Wet N Wild Ebony Hates Chris
Topped by a thick coat of SV
My design process was that first that she's got two young boys and isn't into nails enough probably to spend much time on intricate art. Plus since she's not too girly-girl AND has done a whole lot of kicking-butt and taking charge of the world, she needed something that was loud and demanding. The crackle is quick and easy art, but it's getting tired these days so I added in some abstract shapes with the black, freehanded but no skill or too much time required.
Originally I had started with the white, added the black shapes, then the crackle coat.

On a non-nail note, has anyone ever used one of these Curl Easy Pro Volumizing and Curling Tools??
*This post contains an affiliate link
Monday, July 9, 2012
A Very Important Issue
Today, I need to speak to you about a very important problem. Frequent polish changes that chip. Are you often on your way out the door and need to stop everything to re-do your manicure because of a chip? Would you prefer just to polish and forget it?
Well Nail Polish Canada tells me they are going to rescue one person's manicures FOR LIFE! They are giving away a lifetime supply of CND Shellac! No worries, they're giving away the curing lamp and other necessary items also, so the lucky winner will be able to apply the Shellac and enjoy up to 14 days of chip-free manicures.

The contest is open to Canadian and US residents. Click here to enter (click where it says on that page "click here +/-" despite the fact that it doesn't look like a link, at least in my browser. That confused me for several minutes) and tell them how CND Shellac will change your life!
WIN SHELLAC FOR LIFE ($1266 value) - NAILPOLISHCANADA.COM TO CHANGE YOUR LIFE
“To be fair, it’s actually only a 25 year supply, so we can only hope the winner dies early to keep me an honest woman” - Nikki Smith, VP of Glitter, Nail Polish Canada.
CND Shellac is a cross between nail polish and gel which is cured under a UV lamp and lasts up to 14 days without chipping.
Chipped nails are an important issue that affect lives in many ways. “We’ve invented substantial research and the reason women slap or bite in a catfight is fear of chipping their nails. Hopefully, together, we can build a world where a
woman can throw a punch at the bitch who kissed her boyfriend without worrying about chips” said Ms. Smith
The prize will go to whomever can show that their life will be most impacted by winning Shellac for life. Be it better, or worse.
Maybe it stops your polish addiction long enough that you can save money, go to school, become a doctor, go to Africa and start saving lives. Did we say that this contest saves lives? Now we did.
Or maybe you’re just looking for a little understanding, “My husband will finally understand that other people take polish as seriously as me...” - Sarah P.”
Or perhaps the result won’t be as positive, “I’ll probably spend all my time painting my nails, not go to work, get fired, now I’m homeless, damn you NPC.” - Beth C”
If you or a loved one is still stuck in a world of chips, smudges and wasting countless hours re-doing nails we urge you to take a stand. Enter at http://www.nailpolishcanada.com/categories/cnd-shellac.html
Grand prize will go to the best description of how winning a lifetime supply of Shellac will change their life. Winner selected August 7, 2012.
Prize Details & Entry
Grand Prize (Value $1266): 33 Bottles of CND Shellac + 36 Watt UV Lamp + 5 Topcoat + 5 Basecoat + Scrub Fresh.
How much Shellac do I need to last 25 years?
1300 (weeks in 25 years) / 2 (weeks application lasts) / 20 (applications per bottle) = 33 bottles of Shellac color
Open to Canadian and United States residents only.
Full rules and entry at: http://www.nailpolishcanada.com/categories/cnd-shellac.html
Well Nail Polish Canada tells me they are going to rescue one person's manicures FOR LIFE! They are giving away a lifetime supply of CND Shellac! No worries, they're giving away the curing lamp and other necessary items also, so the lucky winner will be able to apply the Shellac and enjoy up to 14 days of chip-free manicures.

The contest is open to Canadian and US residents. Click here to enter (click where it says on that page "click here +/-" despite the fact that it doesn't look like a link, at least in my browser. That confused me for several minutes) and tell them how CND Shellac will change your life!
______________________________________________
WIN SHELLAC FOR LIFE ($1266 value) - NAILPOLISHCANADA.COM TO CHANGE YOUR LIFE
“To be fair, it’s actually only a 25 year supply, so we can only hope the winner dies early to keep me an honest woman” - Nikki Smith, VP of Glitter, Nail Polish Canada.
CND Shellac is a cross between nail polish and gel which is cured under a UV lamp and lasts up to 14 days without chipping.
Chipped nails are an important issue that affect lives in many ways. “We’ve invented substantial research and the reason women slap or bite in a catfight is fear of chipping their nails. Hopefully, together, we can build a world where a
woman can throw a punch at the bitch who kissed her boyfriend without worrying about chips” said Ms. Smith
The prize will go to whomever can show that their life will be most impacted by winning Shellac for life. Be it better, or worse.
Maybe it stops your polish addiction long enough that you can save money, go to school, become a doctor, go to Africa and start saving lives. Did we say that this contest saves lives? Now we did.
Or maybe you’re just looking for a little understanding, “My husband will finally understand that other people take polish as seriously as me...” - Sarah P.”
Or perhaps the result won’t be as positive, “I’ll probably spend all my time painting my nails, not go to work, get fired, now I’m homeless, damn you NPC.” - Beth C”
If you or a loved one is still stuck in a world of chips, smudges and wasting countless hours re-doing nails we urge you to take a stand. Enter at http://www.nailpolishcanada.com/categories/cnd-shellac.html
Grand prize will go to the best description of how winning a lifetime supply of Shellac will change their life. Winner selected August 7, 2012.
Prize Details & Entry
Grand Prize (Value $1266): 33 Bottles of CND Shellac + 36 Watt UV Lamp + 5 Topcoat + 5 Basecoat + Scrub Fresh.
How much Shellac do I need to last 25 years?
1300 (weeks in 25 years) / 2 (weeks application lasts) / 20 (applications per bottle) = 33 bottles of Shellac color
Open to Canadian and United States residents only.
Full rules and entry at: http://www.nailpolishcanada.com/categories/cnd-shellac.html
Thursday, July 5, 2012
Oh Say Can You See
This post may be awfully written since I'm dying of a migraine and our air conditioning is out when it's 103* and rising, but it's time sensitive so it's got to get done.
Woohoo! While writing that first sentence a friend came over and swooped my kids away to A/C so at least that's a load off my migraine. Let's see how this goes.
For the last few weeks I have been really excited to do some sort of themed manicure for The 4th of July and have been thinking on it. I had a lot of ideas, and in the end I decided my freehand still looks a bit too amateur a lot of the time, I'm short on SV to do a tape mani the way I'd like, and my stamping skills and polish selection aren't up to the task yet. So water marbling it was!
I've been asked a lot how to do this, so I'm hoping to do a tutorial to add to the plethora of water marble tutorials available next week when I do a request for friend, but for now, you're going to get a few process pics and the end result.
Please pardon the awful color, my main point was to show the design and my processing computer died yesterday, so I tried to fiddle with these in some freebie program on my media server. After spending most of the day working on this post, I decided showing you what designs I did was more important than getting the colors right.


I really hate posing nails like this, but there aren't terrific options with water marbling where you really want to show off as much of all 10 nails with as few frames as possible.
Polishes
Base Coat: Gelous
Underwear: Savvy French White White
Marble:
Wet N Wild I Red a Good Book
Wet N Wild Blue Moon
Savvy Fre
nch White White
Glitter Coat: Wet N Wild Hallucinate
Top Coat: Seche Vite
On my right hand I tried to use the Hallucinate in the marble too, but it didn't work well. Putting it as one of the first colors caused it to dry before I could marble and putting toward the end and my solid color drops weren't spreading so the glitter ended up mostly just being lumps under the polish. I was bummed because I wanted streaks like my last marble instead of all over, but such is life! The biggest difference it made though is you can see the colors on my right hand are more primary, on the left, for some reason the white interfered more with the red and blue and I ended up with more pastels. But the right also made a bunch of purple, so in the end, nothing ended up being a BRIGHT red, white, and blue as I planned.
I also wanted to try out nail polish jewelry, making a ring that would match my manicure!

This was HARD to water marble. I have some ideas for next time, which will be happening, because the polish and adhesive never set thanks to the A/C going out. I managed to keep it on well enough until the end of the night, then I got home and it fell apart. It'll be taking an acetone bath soon.
Some process pics for you:
Tuesday, July 3, 2012
NTotD: A Manicure's BFF
Follow my blog with Bloglovin

This is a new series I really hope I can keep up for awhile. Nail Tip of the Day/Tip of the Day! Every once in awhile, I'll share one of my tips that has made a huge difference in health, ease, appearance, or method and made this whole journey worth my time and effort.
If there is anything that does more damage to nails than getting soaked and soft, I don't know what it is. I know, I know, most of you would say a lot of things! But here's how I see it, nothing else matters, if they get so soft regularly during housework like dishes, that they bend and split or peel or tear right off. You can't poison them, dry them out, stain them, or anything if you don't have them! So I ALWAYS! make sure to have gloves on hand.
I keep a heavier pair of dish gloves and I never ever opt out of them. I take the time to put them on for even one single dish to be washed. It takes just a second and makes a huge difference in nail health. The other ones I keep on hand are disposable nitrile gloves (I'm latex sensitive). I throw these on anytime I'm doing anything that is a chemical or physical risk to my nails that I don't want to use my dish gloves for. Scrubbing with chemicals I don't want to worry about transferring to our eating surfaces, check! Digging all the crapola out of the cracks of the backseat of the car that two kids leave behind, check! Yes, even just that. All that digging puts stress on the nail and can tear them or lead to micro-splits that lead to easier breakage, I find that the gloves take some of that stress off of them. If you look back at my first post and my most recent manicure, you can see the difference. This is one of the two single biggest changes in protecting my nails since I started this journey about 7 weeks ago. (Please ignore the middle finger, that's the one that got chopped to the quick by my poor knife work when cooking)
The other huge benefit is it prevents chipping and peeling of your manicure! When your nails get wet, they bend and polish is a lacquer, it doesn't bend well and this allows it to peel off. It also causes separations that allow it to chip easier. Wearing them during dry but physically cumbersome tasks like the above car cleaning, protects the manicure from getting chips and scratches too.

One experiment I'm curious about is using lotion in the disposable ones to moisturize while working similar to the cotton glove at night idea. I can't try it myself though because with the length of my nails, they'd get too moist and become soft and easily breakable while going about my day. I bet it would be great for someone who keeps their nails trimmed much closer to the finger tip. What are your best nail tips?
Sunday, July 1, 2012
Chimneys and Flowers and Giveaways, oh my!
I've been MIA, I know. It's been a long week, both of my kids were in day camps far apart from each other, and I've been extremely sleepy. I've done some manis while I've been gone and some other fun beauty stuff that I'll try to get caught up on over the next few days. Especially since we'll be keeping it close to home these days to save money. It's no-buy central here after the darecho that blew through the East Coast Friday night and did major damage to our house.
.JPG) Yes, that's our chimney laying in our backyard instead of being attached to our house. Ouch.
Yes, that's our chimney laying in our backyard instead of being attached to our house. Ouch.
Before my house decided to reenact a scene from Wizard of Oz, I put on a cute little manicure that was a test run of the Salon Express nail stamping system.

.JPG)
Before my house decided to reenact a scene from Wizard of Oz, I put on a cute little manicure that was a test run of the Salon Express nail stamping system.

It's not the best picture, but for some reason I was having major issues finding focus for this one.
Wednesday, June 20, 2012
Galaxy Nail Art
I've had galaxy nails on my to-do list for awhile now, but I was putting it off until my nails grew long enough to have enough space to get a decent "picture" in. After being inspired by all the amazing swatches at Nouveau Cheap's epic galaxy nail battle, I decided two things: #1 this would be another epically (spell check does not like that but dictionary.com tells me that's the proper spelling of the adverb tense) long manicure if I did it on all 10 nails, #2 my ring finger nails were long enough. When you add 1 + 2 you get:


I ended up using several of the same colors she used without even realizing it, but I did intentionally use one my many China Glaze Riveting's inspired by what appeared to be her boyfriend's use of it and my love of it. The one thing I changed up was instead of making the stars by dotting a light polish, I used my dotting tool to pick up and put down the large hex glitter out of my Revlon Whimsical. I love the idea of an old sponge roller too. I found my makeup sponges are so absorbent that they are worthless for nail art and I'd been looking for an alternative that was cheap. This was perfect since I had several I don't use anymore and it really works amazingly!
I used LA Looks Black Velvet as the base of the nail. This is quickly becoming my favorite nail art black. Perfect formula, it spreads perfectly, can be used in one coat for small art, and is only $1. For the galaxy I used:
(in this general order, one or two may have been switched around)
Wet N Wild Lavender Creme
Wet N Wild Red Red
China Glaze Riveting
Wet N Wild Blue Moon
Revlon Mysterious
Zia Unnamed off-white frost with silver sparkle
Revlon Whimsical
I then covered it with a light coat of Petites Stardust. Careful, this one surprisingly has enough coverage that a regular coat will be too much glitter. Note the difference in coverage between the right and left pictures. Otherwise I'm really impressed with how these came out on my first try! For the rest of my nails I used Wet N Wild Everybody Loves Redmond.
I was not happy with the red, it was just too orange, but I didn't have anything better. But the next day I hit up Rite Aid's Wet N Wild deal and got Burgundy Frost which worked perfectly! I wish I had this exact shade in a creme though, I didn't want the distraction of frost or shimmer or glitter or anything. I really feel like accent nails with nail art needs a complimentary but subdued color on the rest of the nails to allow them to stand out.


In the end, I love this art and can't wait to try it again with other colors. Also I loved that both my husband and my older daughter knew what it was right off the bat! What do you think about galaxy nails? Have you tried it?
Saturday, June 16, 2012
Somebody Loves Me!
And that somebody is my husband! I've been sick on the couch since yesterday and I've needed a redo on my mani. The water marble gave up after a week. Three polish plates popped of climbing in a bounce house with my Girl Scout troop Thursday. Then some started peeling, chipping, and cracking. But I was almost out of acetone and there just no point in trying without plenty on hand. So the dear ran out to Sally's to pick some up. I mentioned that they were having another Red Dot sale and he went and had them pull all of their back stock of a discontinued color I had mentioned. Now, 9 extra bottles of one polish color may be excessive, we'll see. Maybe if this blog gets off the ground I have giveaway stock now, or I'll sell some once they're HTF. But for now, I can do whatever nail art I want with it without worry because it's going to be a very long time until I have to worry about running low.

China Glaze Riveting
Friday, June 15, 2012
Water Marble Mini Me
The day after I did my first water marble mani on myself, my youngest came down with a fever and we were stuck on the couch for the day. She's a total diva and more into the beauty stuff than I, so why not take advantage of her lethargy to give her a really neat mani!

Base of NK Really White
Water Marble with NK Really White and Crayola Grape Raisin, Blueberry, Green Apple, Orange, and Bubble Gum
Top coat 2 coats of SV
Unfortunately her manis don't last very long because she's a dedicated picker, but she enjoyed it while it lasted!
Thursday, June 14, 2012
Water Marble!
I really, REALLY tried to put this technique off until my nails were a bit longer, but I just have no patience. This was so much fun, there was very little learning curve to it, and it really didn't take that long for the results that come out of it. I had originally planned to just do it on accent nails, but it was too fun and easy, I'd do two, top coat it, and within an hour, I was doing another pair of fingers! I ended up with a full mani that's impressed everyone.
I started with a base coat of Gelous, 2 coats of Sinful Colors 24/7, and 2 coats of Seche Vite. I know, we've started this off with a lot of polish already! I probably could have just used one coat of the 24/7 since it's just underwear, but the 2 coats of SV is really necessary because if you get a bad marble, you can use your clean-up brush and some acetone to brush off the marble without bringing the underwear with and then slap on more SV and save starting over from scratch! Since I had this happen 3 times (I was trying for a certain design, otherwise this has a much higher success rate), it seems to have been a good plan. I topped the marbling with at least 4 coats of SV. This is good and bad as you'll see later.
Sorry about the weird color balance, these pigments are very hard to correct for, the nails are pretty true to life, my hands are not that color ;P


This is the best home mani I have ever had! Here's how my left hand looks 6 days later.
 Overall standings: Day 3 one finger's full plate of polish popped off, I saved it and re-glued it once I returned home (ring finger in this picture, looks the same as the day I put it on, that white at the edge is polish, not chipping); Day 5 another polish plate fell off, I re-glued it (pointer finger in this picture, my aim was off, it's glue too far back so you can see some exposed nail at the tip, oops); Day 5 a not so small, but not huge chip on my right thumb, not very noticeable though, I can live with it; Day 5 same thumb polish plate popped off, re-glued it and it looks just as good as new except that chip.
As you can see, Day 5 seems to be hitting the limit, but I'm going to try to wear them through Friday to show off at a gathering I go to on Fridays, that will mean over a week with the same polish! AMA-ZING! That pop off on Day 3 was my nail snagging and ripping at something, frankly I think the polish saved my nail from breaking, so not too shabby. The thickness caused by all the polish plus my excessive coats of SV creates a lot of strength and depth which I like, but it's a catch 22. The thickness saved my nail plus allowed the "plates" to pop off in a repairable way instead of chipping or peeling, but it may have also led to them popping off in the first place, maybe they wouldn't have popped off if I didn't put so many layers on?
One thing I noticed and am really frustrated by: When the nails came off, I got to see what my nail plate looks like after nearly a week with the same polish on, and they're quite stained. 24/7 isn't all that well pigmented, obviously while Gelous is providing the strength I need to grow my nails out, it's not protecting the plate from staining. I'm working hard at staying well-hydrated to prevent as much as I can, but what's your favorite base coat? Does it do a good job at preventing stains?
I started with a base coat of Gelous, 2 coats of Sinful Colors 24/7, and 2 coats of Seche Vite. I know, we've started this off with a lot of polish already! I probably could have just used one coat of the 24/7 since it's just underwear, but the 2 coats of SV is really necessary because if you get a bad marble, you can use your clean-up brush and some acetone to brush off the marble without bringing the underwear with and then slap on more SV and save starting over from scratch! Since I had this happen 3 times (I was trying for a certain design, otherwise this has a much higher success rate), it seems to have been a good plan. I topped the marbling with at least 4 coats of SV. This is good and bad as you'll see later.
Sorry about the weird color balance, these pigments are very hard to correct for, the nails are pretty true to life, my hands are not that color ;P


Sinful Colors 24/7 and Dream On, China Glaze Riveting, NK Really White, LA Colors Black Velvet
I think Riveting has become a serious favorite of mine. Can you see on the middle finger of the picture on the right how it's swirled over the black? AMAZING! I'm going to have to stock up on it since it's already hit the clearance racks and will be HTF soon!
This is the best home mani I have ever had! Here's how my left hand looks 6 days later.

As you can see, Day 5 seems to be hitting the limit, but I'm going to try to wear them through Friday to show off at a gathering I go to on Fridays, that will mean over a week with the same polish! AMA-ZING! That pop off on Day 3 was my nail snagging and ripping at something, frankly I think the polish saved my nail from breaking, so not too shabby. The thickness caused by all the polish plus my excessive coats of SV creates a lot of strength and depth which I like, but it's a catch 22. The thickness saved my nail plus allowed the "plates" to pop off in a repairable way instead of chipping or peeling, but it may have also led to them popping off in the first place, maybe they wouldn't have popped off if I didn't put so many layers on?
One thing I noticed and am really frustrated by: When the nails came off, I got to see what my nail plate looks like after nearly a week with the same polish on, and they're quite stained. 24/7 isn't all that well pigmented, obviously while Gelous is providing the strength I need to grow my nails out, it's not protecting the plate from staining. I'm working hard at staying well-hydrated to prevent as much as I can, but what's your favorite base coat? Does it do a good job at preventing stains?
Wednesday, June 13, 2012
Girl Scouts Rock the Mall!
In addition to being addicted to nail polish, I'm a Daisy Girl Scout leader. This year marks 100 years of Girl Scouting in the US and this past Saturday our council tried to put off a huge sing along on the National Mall with 200,000 Girl Scouts. I say "tried" because the general consensus seems to be they failed miserably and it was an embarrassment to the Nation's Capital.
But anyway, I did a special pedicure just for the day!
 I have awful feet, I know. I'm an avid gardener among other feet uglying activities that I do barefoot or in flip flops pretty much always. But I'm working on them! The blue is Revlon Mysterious and the green is Wet N Wild Fast Dry SaGreena the Teenage Witch (I love the Fast Dry names!) with the painting done in NK Really White. I have shown these off to EVERYONE! I cannot draw for anything, so I totally impressed myself with these, especially the right one! And I just adore these two colors together, they're definitely going to make more appearances as a pair around here.

But anyway, I did a special pedicure just for the day!


My Girls trying to keep cool
Wednesday, June 6, 2012
Giveaway!
What a sellout I am ;P I never win anything, so I'm taking all the entries I can get. Polished Indulgence is having a terrific little giveaway over on her blog for her birthday! Go on over, check out all the polish goodness she has to offer, and enter for yourself!
Simple Bling
One of the things I've learned on this new fingernail polish journey is how much layering really can effect a polish. I'd often see these in-the-bottle-gorgeous chromes and glitters, bring them home, and be so disappointed. Well guess what? It turns out that layering them over other colors has a massive effect! Here's 1 coat of Sally Hansen HD DVD over 1 coat of Wet N Wild Ebony Hates Chris and topped with 1 coat of SV.

It's a blue/purple duo-chrome with an ultra-fine glitter/shimmer.
I tried to get the two colors in the pic, but it was hard even though it shows up very well inside or outside. You can see the purple at the top of my pointer finger. This was easy to put on, a little thin, but not too bad. I had it peel back after a very long shower and fixing it with a touch-up brush was quick and easy, which always bodes well for the formula.
Shades of Grey!
I'm sure everyone has seen by now the press release from Pure Ice today about the coming Five Shades of Grey collection. I first saw it over at Prim and Polished today and my mind was BLOWN. I read the first book. I sort of enjoyed it. I wouldn't feel okay recommending it to anyone else. But this collection is such a terrific combination of colors and finishes and textures, I just can't wait to have it!
Tuesday, June 5, 2012
Sparkling Darkness
I've been trying to put this off until my nails got longer, but I'm not patient enough. Does the fact that these are actually freehanded tips make up for my impatience? I think I did a pretty darned good job for someone who a month ago looked like a 3rd grader when I tried to paint the entire nail! The worst was the middle finger you see, it was a bit wide, so I painted over the too-wide glitter with the black using a detail brush. Worked out wonderfully enough until the SV dragged it when I top-coated it. That's the little ding you see dragging into the CG on that finger.

2 coats of Wet N Wild Fast Dry Ebony Hates Chris
1 coat SV
2 coats of China Glaze Liquid Crystal on the tips
2 coats of SV

2 coats of Wet N Wild Fast Dry Ebony Hates Chris
1 coat SV
2 coats of China Glaze Liquid Crystal on the tips
2 coats of SV
Monday, June 4, 2012
Something This Way Nautical Comes
Thursday I thought I'd try a sponged gradient. It failed. My base was already on in China Glaze's Riveting and I had Revlon's Mysterious out as one of my gradients, so it was time for a quick change of plans.

I ended up with this funky french that reminds me of something nautical. I've been trying for days to put my finer on what it is, but it's just not coming to me. But between them and my homemade strawberry-lemonade, I felt like a fancy lady of summer!

I ended up with this funky french that reminds me of something nautical. I've been trying for days to put my finer on what it is, but it's just not coming to me. But between them and my homemade strawberry-lemonade, I felt like a fancy lady of summer!
Wednesday, May 30, 2012
Citrus Funky French and a Fix-it Tip!
I did a super cute funky french today, but first, you need to see my take from Rite Aid's Revlon 40% off sale!


 |
| R-L: Mysterious, Whimsical, Midnight Affair, Sassy, Zealous |
$3 each, and there's some deal where you accumulate $30 in nail purchases and get $10 back. Well, I had quite a bit already accumulated, so I have another $10 to spend on polish! Heh.
On to the manicure and my fix.

The bottom layer is Zealous with Sassy for the tips. I LOVE both of these colors, but the Zealous really needs "underwear", lol. I think I got up to 4 coats when I said, good enough. It's probably great over something, and I can't wait to try it, but that's not today. The lack of opacity is the root of today's problem though. I did my coats, put a coat of SV on it because I knew I'd be stuck on the couch for hours waiting to do the tips without, then I went out to take a picture of them and dinged on of my thumbs with my camera.

Now see, the way that SV works is that it rapid dries over your wet polish while allowing your polish to dry. Well, with 4 coats and high humidity, you end up with this dry, gelatinous nail for quite awhile. The ding was actually, much larger, but I'd already started work when I thought to take a picture. Since the top is dry and the under is wet, just massage it to move some of the wet polish back into the area. I couldn't fill it all in here because the SV had adhered to my nail at the "point of impact". Once it is as good as it is going to get from massage, place a drop of polish into the ding, move it around so it's about level with the rest. Don't worry about perfect blending, that'll be dealt with next. Next, another coat of SV to seal it in and hide the fix.

All gone! The only remnant, if you look VERY closely at the center of the nail, you can see some squiggly lines from the reaction between the massaged polish and the additional coats of SV.
Monday, May 28, 2012
Happy Memorial Day!
I decided I wanted to do something for Memorial Day, but nothing that screamed "Cheesy patriotic should only be worn on the 4th of July!" My original idea was the glitter half moon, with a blue background and red "stars" for a kind of memorial concept. But I don't have a red that will dot well over the blues I have, so it had to go the other way. I like it, but not as a patriotic look. My husband said "ladybugs!" Yeah, that's about what I thought.

Layers:
1 coat Gelous
2 coats China Glaze Polarized - I wanted to try to only coat a little more than necessary for the moon so as not to waste. It's really hard to see, but unfortunately the red is a jelly and just barely shows it through. I don't think I'll bother in the future though, the SV does a good job of evening out, but not quite enough with the glitter.
2 coats Seche Vite
1 VERY THICK coat Revlon Cherry Burst - Bottle says creme, but it really is a jelly
1 coat Seche Vite
Dotted with So Easy Stripe Rite no-name blue using a dotting tool instead of the striping brush.
2 coats Seche Vite
I need to get a new clean-up brush. And I'm going to avoid brushes made for facial makeup this time. Since they're not intended to be cleaned with solvents, there's just no guarantee they're crimped instead of glued. The one I have now is glued and it's a major trouble maker. Next time is a small paintbrush. Then my clean-up will look nicer.
As for my half moon technique, I don't quite like the arc on the standard hole reinforcements that most people use, and I'm still too cheap for proper guides. So I hit up Dollar Tree and bought a pack of circular garage sale stickers, clipped arcs off with my itsy bitsy fingernail scissors, and voilà! Enough guides for a lifetime!

They don't look like they're sticking there, but you just press them down right before putting the paint on and they work perfectly!
I think this mani will hang around for a few days. I've spent a lot of hours this weekend doing nails. I have to get back to other things.
Sunday, May 27, 2012
Crafty Tape
More Chloe's Nails inspired hi-jinks from me. I wanted to try a Scotch tape mani using the craft scissors to shape my tape. Again with the READ THE TUTORIAL FIRST! problem. It took me HOURS. I should have read first, see?! It went over well at church, was very nicely thick and protective, and I learned a lot. So I guess it all worked out.

NK Really White, then Finger Paints Grape Gumball, topped with China Glaze...Full Spectrum? It could have been Prism, I forgot already. Topped off with 2 coats of SV for shine and much needed leveling.
Friday, May 25, 2012
Catching On
When I first started poking around on this nail polish journey, I came across these beautiful nails done in honor of The Hunger Games over at Chloe's Nails. Well lucky me, I came across several members of the China Glaze Capital Collection, marked down to clearance, and on a red dot sale! $1.69 per bottle! So I carted it over to the playground to meet with friends while our kids played. I learned that #1 I need to read the tutorials for techniques first, and #2 doing nails in 88+ degrees with high humidity does not turn out well even when using Seche Vite.

China Glaze Smoke & Ashes with Electrify
Thursday, May 24, 2012
She's a Liar!
Since I've decided to try out this manicuring thing, I read around to see what's changed in the world of nails since I last looked and I found magnetic nail polish! Talk about awesome. You can look like you have a professionally airbrushed mani with very little effort. While the picture isn't the best, this was so impressive in real life, that a friend accused me of lying about doing my nails myself. I'm sold, and I've been buying up every one I can get my hands on.

China Glaze Magnetix - Attraction
For this I applied 1 coat of Gelous for my base then an "under"coat of the polish. For the 2nd polish coat, paint a decently thick coat on one finger at a time, then apply the magnet. I would hold my finger up to eye level, it's close enough when you see the iron particles start to pull away from the nail toward the magnet and hold for 15-20 seconds. Honestly, I had far less trouble with this brand magnetic than it seems most bloggers had. Maybe they were leaving their fingers on the table and not looking at it? After all 10 fingers are done, a thick coat of SV to finish it off!
Sunday, May 20, 2012
Experimentation
This blog is an experiment of sorts. I want to see if I can grow my nails out, break the nail picking habit, use manicuring my nails as a sort of psychotherapy, improve my manicuring skills, and find out if I enjoy blogging about them. I've learned a lot so far, and over the next few weeks I'll talk about that.
For today, the first one I photographed, these were done about 4 days ago on a whim, before I had settled into any idea that I really wanted to get into painting my nails. No top or base coats, both colors are from the Wet n Wild - Wild Shine line; the base is one coat of Lavender Creme with one coat of Sparked on top.

For today, the first one I photographed, these were done about 4 days ago on a whim, before I had settled into any idea that I really wanted to get into painting my nails. No top or base coats, both colors are from the Wet n Wild - Wild Shine line; the base is one coat of Lavender Creme with one coat of Sparked on top.

Not a clue why this is called Lavender anything though, it's most certainly pink with not a hint of purple anywhere to be found. Sparked is a pretty high density glitter. For a $0.99 bottle, it goes one well, has great coverage, and is great fun for my two little girls. It has taught me that I will NEVER wear glitter without 100% acetone around ever again though! This is the most difficult to remove glitter I have used to date.
Subscribe to:
Comments (Atom)