There's a lifetime of Freud in there somewhere.

Wednesday, May 30, 2012

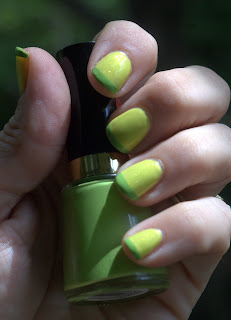
Citrus Funky French and a Fix-it Tip!

I did a super cute funky french today, but first, you need to see my take from Rite Aid's Revlon 40% off sale!

R-L:  Mysterious, Whimsical, Midnight Affair, Sassy, Zealous

$3 each, and there's some deal where you accumulate $30 in nail purchases and get $10 back.  Well, I had quite a bit already accumulated, so I have another $10 to spend on polish!  Heh.

On to the manicure and my fix.


The bottom layer is Zealous with Sassy for the tips.  I LOVE both of these colors, but the Zealous really needs "underwear", lol.  I think I got up to 4 coats when I said, good enough.  It's probably great over something, and I can't wait to try it, but that's not today.  The lack of opacity is the root of today's problem though.  I did my coats, put a coat of SV on it because I knew I'd be stuck on the couch for hours waiting to do the tips without, then I went out to take a picture of them and dinged on of my thumbs with my camera.


Now see, the way that SV works is that it rapid dries over your wet polish while allowing your polish to dry.  Well, with 4 coats and high humidity, you end up with this dry, gelatinous nail for quite awhile.  The ding was actually, much larger, but I'd already started work when I thought to take a picture.  Since the top is dry and the under is wet, just massage it to move some of the wet polish back into the area.  I couldn't fill it all in here because the SV had adhered to my nail at the "point of impact".  Once it is as good as it is going to get from massage, place a drop of polish into the ding, move it around so it's about level with the rest.  Don't worry about perfect blending, that'll be dealt with next.  Next, another coat of SV to seal it in and hide the fix.  


All gone!  The only remnant, if you look VERY closely at the center of the nail, you can see some squiggly lines from the reaction between the massaged polish and the additional coats of SV.
Monday, May 28, 2012

Happy Memorial Day!

I decided I wanted to do something for Memorial Day, but nothing that screamed "Cheesy patriotic should only be worn on the 4th of July!"  My original idea was the glitter half moon, with a blue background and red "stars" for a kind of memorial concept.  But I don't have a red that will dot well over the blues I have, so it had to go the other way.  I like it, but not as a patriotic look.  My husband said "ladybugs!"  Yeah, that's about what I thought.


Layers:
1 coat Gelous
2 coats China Glaze Polarized - I wanted to try to only coat a little more than necessary for the moon so as not to waste.  It's really hard to see, but unfortunately the red is a jelly and just barely shows it through.  I don't think I'll bother in the future though, the SV does a good job of evening out, but not quite enough with the glitter.
2 coats Seche Vite
1 VERY THICK coat Revlon Cherry Burst - Bottle says creme, but it really is a jelly
1 coat Seche Vite
Dotted with So Easy Stripe Rite no-name blue using a dotting tool instead of the striping brush.
2 coats Seche Vite

I need to get a new clean-up brush.  And I'm going to avoid brushes made for facial makeup this time.  Since they're not intended to be cleaned with solvents, there's just no guarantee they're crimped instead of glued.  The one I have now is glued and it's a major trouble maker.  Next time is a small paintbrush.  Then my clean-up will look nicer.

As for my half moon technique, I don't quite like the arc on the standard hole reinforcements that most people use, and I'm still too cheap for proper guides.  So I hit up Dollar Tree and bought a pack of circular garage sale stickers, clipped arcs off with my itsy bitsy fingernail scissors, and voilĂ ! Enough guides for a lifetime!


They don't look like they're sticking there, but you just press them down right before putting the paint on and they work perfectly!

I think this mani will hang around for a few days.  I've spent a lot of hours this weekend doing nails.  I have to get back to other things.


Sunday, May 27, 2012

Crafty Tape

More Chloe's Nails inspired hi-jinks from me.  I wanted to try a Scotch tape mani using the craft scissors to shape my tape.  Again with the READ THE TUTORIAL FIRST! problem.  It took me HOURS.  I should have read first, see?!  It went over well at church, was very nicely thick and protective, and I learned a lot.  So I guess it all worked out.

NK Really White, then Finger Paints Grape Gumball, topped with China Glaze...Full Spectrum?  It could have been Prism, I forgot already.  Topped off with 2 coats of SV for shine and much needed leveling.

Friday, May 25, 2012

Catching On

When I first started poking around on this nail polish journey, I came across these beautiful nails done in honor of The Hunger Games over at Chloe's Nails.  Well lucky me, I came across several members of the China Glaze Capital Collection, marked down to clearance, and on a red dot sale!  $1.69 per bottle!  So I carted it over to the playground to meet with friends while our kids played.  I learned that #1 I need to read the tutorials for techniques first, and #2 doing nails in 88+ degrees with high humidity does not turn out well even when using Seche Vite.


China Glaze Smoke & Ashes with Electrify

Thursday, May 24, 2012

She's a Liar!

Since I've decided to try out this manicuring thing, I read around to see what's changed in the world of nails since I last looked and I found magnetic nail polish!  Talk about awesome.  You can look like you have a professionally airbrushed mani with very little effort.  While the picture isn't the best, this was so impressive in real life, that a friend accused me of lying about doing my nails myself.  I'm sold, and I've been buying up every one I can get my hands on.  

China Glaze Magnetix -  Attraction

For this I applied 1 coat of Gelous for my base then an "under"coat of the polish.  For the 2nd polish coat, paint a decently thick coat on one finger at a time, then apply the magnet.  I would hold my finger up to eye level, it's close enough when you see the iron particles start to pull away from the nail toward the magnet and hold for 15-20 seconds.  Honestly, I had far less trouble with this brand magnetic than it seems most bloggers had.  Maybe they were leaving their fingers on the table and not looking at it?  After all 10 fingers are done, a thick coat of SV to finish it off!

Sunday, May 20, 2012

Experimentation

This blog is an experiment of sorts.  I want to see if I can grow my nails out, break the nail picking habit, use manicuring my nails as a sort of psychotherapy, improve my manicuring skills, and find out if I enjoy blogging about them.  I've learned a lot so far, and over the next few weeks I'll talk about that.

For today, the first one I photographed, these were done about 4 days ago on a whim, before I had settled into any idea that I really wanted to get into painting my nails.  No top or base coats, both colors are from the Wet n Wild - Wild Shine line; the base is one coat of Lavender Creme with one coat of Sparked on top.


Not a clue why this is called Lavender anything though, it's most certainly pink with not a hint of purple anywhere to be found.  Sparked is a pretty high density glitter.  For a $0.99 bottle, it goes one well, has great coverage, and is great fun for my two little girls.  It has taught me that I will NEVER wear glitter without 100% acetone around ever again though!  This is the most difficult to remove glitter I have used to date.